vSAN Storage Policies

I get a lot of questions about vSAN and its storage policies.  “What exactly does FTT mean?”, “What should I set the stripe to?”.  The default storage policy with vSAN is FTT=1 and Stripe=1.  FTT means Failures To Tolerate.  Stripe is how many drives an object is written across.

FTT=1 in a 2 node configuration results in mirror of all data. You can lose one drive or one node which results in 200% storage usage.  In a 4 node or larger configuration it gives you RAID 5 which is data being distributed across nodes with a parity of 1.

FTT=2 requires 6 nodes and you can lose 2 drives or 2 nodes.  This is accomplished through using RAID 6 which is parity of 2, and results in 150% storage usage.

If you want to check the status go to Cluster > Monitor > vSAN > Virtual Objects.  From here you can see the FTT and what disks it involves.  From the picture you can see with the 2 node vSAN cluster the objects are on both nodes resulting in RAID 1 or mirroring.

2017-08-30 12_36_08-vSphere Web Client

Now lets break  down which each setting is.

2017-08-28 10_01_51-vSphere Web Client

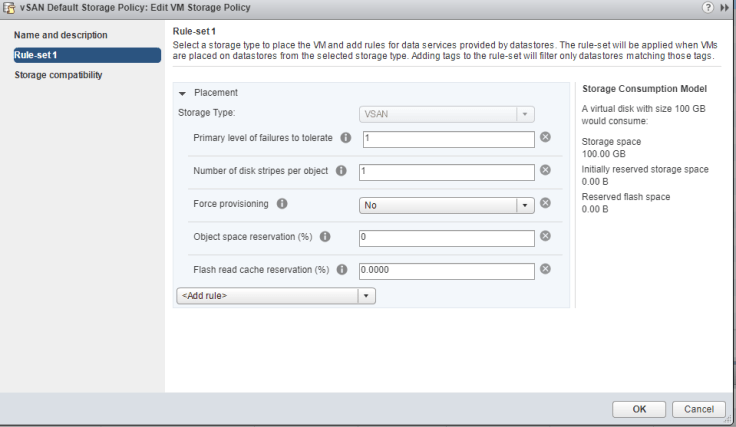
Striping breaks apart an object to be written across multiple disks.  In a all  flash environment there is still one cache drive per disk group, but it is used just to cache writes.  The rest of the drives are use for reads.   In a hybrid configuration reads are cached on the SSD, but if that data is not on the disk it will then be retrieved from the slower disks.  This will result in slower performance, but by having the object broken apart, and written across multiple disks it can result in increased read performance.  I would recommend leaving the stripe at 1 unless you encounter any performance issues.  The largest size an object can be is 255GB.  If it grows beyond that size it will be broken up into multiple objects across multiple disks.

Force provisioning allows an object to be provisioned on a datastore even if it is not capable of meeting the storage policy.  Such as you have it set for FTT=2, but the cluster is only 4 nodes so its only capable of FTT=1.

Object Space Reservation controls how much of an object is thick provisioned. By default all storage is thin provisioned with vSAN.  You can change this by increasing the percentage.  If you set it to 100% then the object will be thick provisoined.  You can set it anywhere between 0%-100%.  The only caveats are with deduplication and compression its either 0% or 100%.  By default the page file is 100%, but there is a command line setting you can change if you need to save this space.

Flash Read Cache reserves the amount of cache you want reserved for objects.  The max amount of storage the cache drive can use is 800GB.  If you have have 80 VM’s each with 100GB in storage then the entire cache drive storage is used.  When you power on the 81st VM the cache drive will not be able to give that VM any read cache.  That is why its best to not change the default unless you have a technical reason to.


How To Install vSAN Updates

VMware is making a lot of great progress with vSAN.  One of the biggest pain points with the technology is the daunting HCL.  VMware spends a lot of time working with hardware vendors to validate the various hardware and firmware versions with vSAN.  In the past this meant manually checking to verify you were running on the right firmware version.  Now with vSAN 6.6 it will automatically check if your running the correct firmware version, and if not you can download and install the firmware automatically.  I found one simple issue with this.  The buttons are not very clear about what they do.  As you can see from the below image it looks like those buttons would refresh the page.  The arrow points to the button that “updates all”.  By selecting that it will apply the update to all your host.  You can do this to all at once or through a rolling update.

2017-08-28 09_46_26-Pasted image at 2017_08_18 08_02 AM.png ‎- Photos

vCenter Fails after Time Zone Change

We recently changed our NTP server, and I needed to update all or hosts and vCenters.  I have a handy powershell script to update the ESXi hosts, but that script does not work on the vCenter servers.  I log into the server using port 5480 to gain access to the vCenter Management. I login as root and notice that the time zone is UTC.  I am in the Central time zone so I wanted to change it from UTC.  Turns out if you do that it break everything.  I had to learn this the hard way, and once I changed the time zone I was not able to log into vCenter.  I had to then go back and change the time zone back to UTC to regain access. Capture.

Only Default Printer Mapping Over With View 6.2

I recently had an issue with only the default printer being mapped over from the local Windows 7 PC to the View Client session.  It did not make any sense to me.  I had 10 printers mapped yet only 1 was showing up.  It turns out its a limitation of Windows 7.  If all the printers are using the same Driver and Port then you will only see the default printer under the Devices and Printers page.  If you right click that printer it will list all the printers you have mapped.  When you try to print something it will also list all your printers.

2 Node vSAN Design for a Remote Site

I was recently asked to design a solution for a remote site.  The requirements were it had to be cheap, run a few virtual machines, fail over capability and have shared storage The workloads are going to be very light so there is no need for powerful servers.  I had a few options with this.  Technically one server could run the entire workload, but that does not allow for any failure so I needed at least two servers.  This would provide a fail over capacity of only 1.  Bare minimum but acceptable for this use case.  These two servers would need some kind of shared storage. One option would be using a small storage array such as the DELEMC VNXe.  I have used these previously, and they were a great solution for the time, but the times are changing and I think hyperconvergence is the future.  With vSAN 6.5 there were a lot of new features that it would make it a perfect solution.

Previously with any Hyperconvereged solution you needed 3 nodes.  3 nodes are used to check for everything being online.  If 1 out of the 3 nodes goes down the other two nodes can check with each other to verify that the node actually went down.  To get away with using 2 nodes you use an external witness.  This external witness could run on a separate server on the site or at the main data center.

With vSAN you have one SSD per Disk Group (DG) to be used for cache.  Since this had to be a cheap solution my area on constraint was cost, and everything had to be a minimal design to get the job done.  Each server would have 1 DG with an 800GB SSD and 4 4TB 7.2k HHD.  This allowed for FTT=1 or only 1 host could be lost.  There is some risk with this design.  There is always a chance that in a maintenance situation one of the host would be in maintenance mode, and  this would leave a single point of failure.  Because there would only be 1 DG available on the one online host, but this is an acceptable risk for the constraint of cost.

One of my favorite new features with 6.5 is direct connect.  With this you can now directly connect two hosts to each other instead of running through a switch.  Each of these server have 2 1GB ports and 2 10GB ports. The remote site switch infrastructure is only 1GB.  Now 1GB can be a serious limitation for storage, and I wanted to avoid that.  With direct connect you can directly connect the two host to each other, and all storage traffic would then go across that link.  Leaving the 1GB ports to be used by the VM traffic.

As you can tell this is an bare minimum design for vSAN and hyperconvergence.  It does meet all the requirements such as Cost, Availability, Share Storage.  In the event of a host going down HA can restart all the VM’s on the second node providing minimal downtime.  This provides the optimal solution for the requirements of the design.


Find Block Size with vscsiStats and Other Storage Statistics.

Ever wonder what block sizes your VM’s are using for writing and reading to disk?  I always have and I recently found a way to get this information out of the ESXi hypervisor.  You can also get a lot of other data such as random and sequential writes, latency, and a few other items.

  1.  Connect to the host with SSH.
  2. Enter the command “vsciStats -l” This will list all the VM’s on that host and its disk.
  3. vsciStats -s will start that stats collection.  You can pair this down by using the -w for the world group id and -i for handle id.
  4. vsciStats -p ioLength -w 123456 would display the block sizes for that particular VM and drives.
  5. -h will give you a list of all the possible variables to use.

Set NTP on all host in vCenter

Here is a Powershell script that will set NTP on all the ESX host connected to your vCenter.

First connect to the vCenter using Connect-VIserver then run the following code.


#Get Host
write-host “Gathering ESX Host”
$esx = get-vmhost

#Configure NTP server
write-host “configuring NTP”
Add-VmHostNtpServer -VMHost $esx -NtpServer 10.10.16.220

#Allow NTP queries outbound through the firewall
wrtie-host “Setting Firewall Permissions”
Get-VMHostFirewallException -VMHost $esx | where {$_.Name -eq “NTP client”} | Set-VMHostFirewallException -Enabled:$true

#Start NTP client service and set to automatic
write-host “Starting NTP service”
Get-VmHostService -VMHost $esx | Where-Object {$_.key -eq “ntpd”} | Start-VMHostService
Get-VmHostService -VMHost $esx | Where-Object {$_.key -eq “ntpd”} | Set-VMHostService -policy “automatic”


Create Storage on Pure

In this post I am going to explain the creation of a storage volume on a Pure Storage array.  It has great and easy to use interface that utilizes HTML5.  I have worked with a few different storage arrays and it is by far the simplest to use.

  1.  When you first login to the Pure Storage array you will be greeted with a screen similar to this.first screen.PNG
  2. Now click on Storage and you will be greeted with a screen covering the Hosts and Volumes.  In this screen you will see all the host you have provisioned, and details on the storage usage.

    3. Click on the + sign to setup the host on the array and select host.  Enter a name and hit create.  Now your host is created and its time to enter the WWN.create host4.  Now if you are running vCenter Cody Hosterman has a great Powershell script that will import all your Host and WWN for you.  If not here is were we enter the WWN.  Click on Host Ports and then click the  gear on the right side, and select configure WWN.  From here if you already zoned in the storage you will see your WWN; if not you can go ahead and enter them manually.wwn
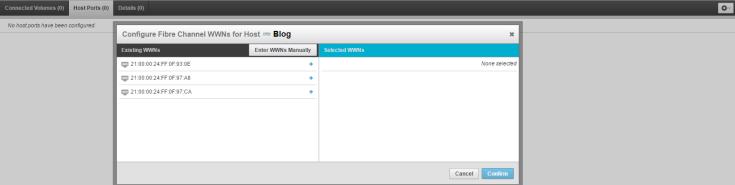
5. Now that your Host is created and zoned in its time to create the Volume and connect it to the host.  Click Volumes + sign at the bottom left and the screen, and enter the size Volume you want.
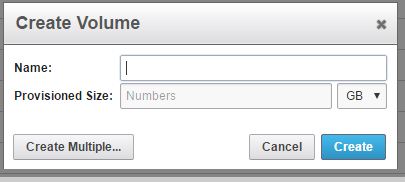
  volume

6. Now click on your host and click the gear and choose Connect Volumes.  finish

Now your Volume is ready to go.  Its a fairly simple and straight forward process.

In future posts I plan on covering the setting up snapshots and replication.  I will also cover the same information on EMC XtremIO. Thanks for reading and look for the next post coming soon.

Blog at WordPress.com.

Up ↑